
I’m doing the A to Z Challenge for the month of April with the theme “Learn to Crochet A to Z.” For more details, and to see previous posts, click here!

I’m very excited about today’s post, because I absolutely love granny squares. In case you’re unfamiliar with them, they’re a crochet motif that’s a staple in most crocheters’ knowledge. They’re one of the first things I learned to crochet, and I’m super glad it worked out that way, because they’re very satisfying to make but not too hard. They’re also one of the first things I teach new crochet students, and it’s always a big hit. There are just so many things you can do with granny squares – my favorite is making blankets, but bags, pillows, and scarves are popular choices as well.

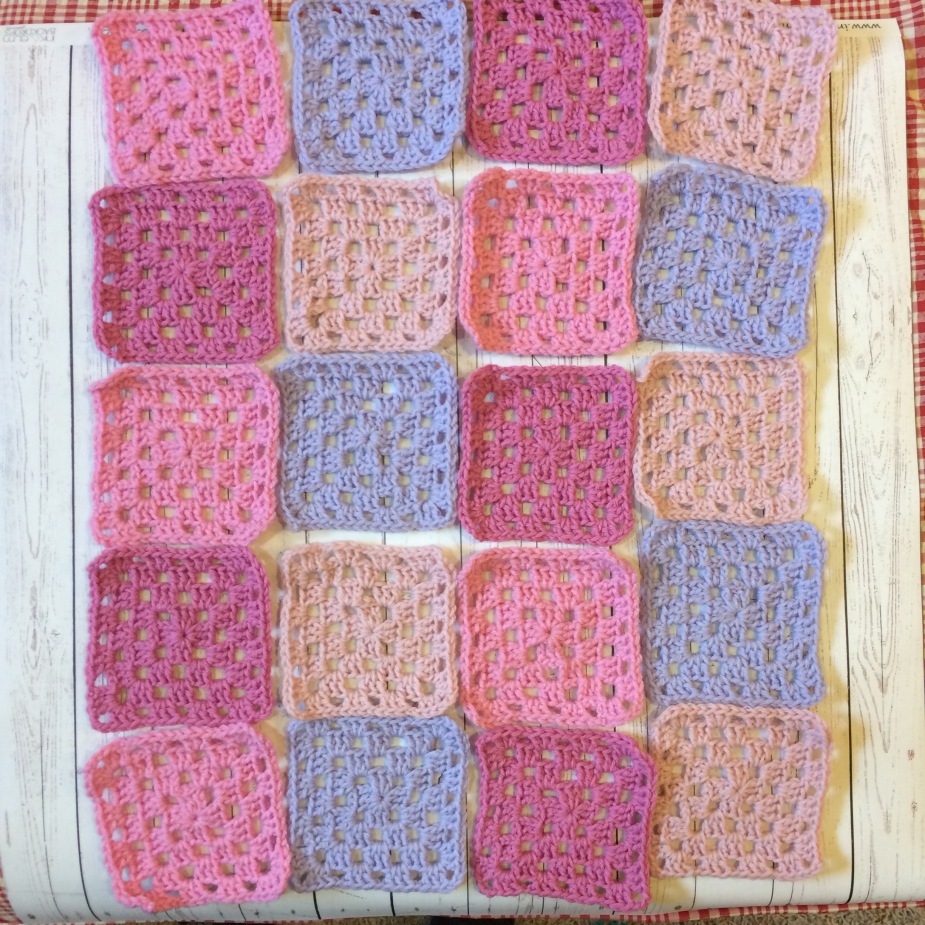
Here’s a whole stack of granny squares I made for a puppy afghan. They’re pretty fast to make, and rather addictive. All you need to know is the chain, double crochet, and slip stitch, and I’ll walk you through it step by step. We’ll also be talking about joining the squares together so you can make the aforementioned projects with them. Of course, it’s super fun to just make a massive granny square and use that as a blanket – my mom made a beautiful multicolored afghan that way. So there’s that option too, if you don’t want to worry about joining. In fact, one of my crochet students made a gorgeous color blocked afghan that’s a giant granny square, and three more are working on massive granny squares. It’s quite a popular project!

Basic Granny Square
First, let’s talk materials! You can make granny squares with absolutely any crochet hook and yarn combination. Just make sure the crochet hook goes with your yarn (look on the yarn label to see the recommended size). I like making them with acrylic worsted-weight yarn and an I (5.50 MM) hook. An H (5.00 MM) hook would make them a little smaller. I also love how they look with a K (6.50 MM) hook, because it makes a more open-weave pattern. For a nice cozy afghan, definitely go with an H or I hook – my mom makes most of her afghans with H hooks, I think, and they’re so warm and cozy. If you’re making a blanket, I would really recommend acrylic yarn for its washability.
I’m going to do a picture for each round and give you the directions under it. There are fantastic tutorials on YouTube if you want to see a step-by-step for each stitch!

Round 1: To start off, leave a long tail so you can weave it in later (more on that later in the month). 8 inches should do the trick. Make 4 chain stitches, and slip stitch into the first chain. This forms a little ring where you’ll be making the first round.
Chain 3, and make 2 double crochets into the ring. This makes your first “cluster,” or group of 3 stitches. Chain 3 for the first corner.
Make 3 double crochets into the ring, and chain 3 for the corner. Repeat these steps two more times, so you have 4 clusters and 4 corners. (Which is fairly intuitive, as a square has four corners. I’m no mathematician, but I did pass geometry.)
To join the square and finish the round, stick your hook into the space created by the first chain 3 and make a slip stitch. Then slip stitch into the top of the next two stitches. Make one last slip stitch into the big corner space. Your first round is done! {above picture}

Round 2: Start by chaining 3 and making 2 double crochets into the same big space. Chain 3 for the corner, and make 3 more double crochets into the same space. You can see how this looks in the picture above. This forms your first corner – you can see it’s made up of 2 clusters and a chain-3.
You’ll be making 3 more of these corners all the way around. First, chain 1 to make the side space – your sides will get longer and longer with each subsequent round. Then go into that next big corner space, it’s in the upper left-hand corner in the picture. Make 3 double crochets, chain 3, and 3 more double crochets.
Repeat this process – chain 1, make 3 double crochets, chain 3, 3 double crochets into the corner – two more times, until you’re back at the start. Chain 1 to make the last side space. Then make the joining slip stitches as described at the end of Round 1.

Round 3: Start by chaining 3 and making 2 double crochets into the same corner space. Then chain 3 for the corner and make 3 more double crochets into the same corner space.
Now we’ll be working along the side. Chain 1 to make a side space. We’ll be working into the next space, which is a little smaller than a corner space – that’s because it’s a side space and is made with a chain 1. Remember from Round 2? Into that space, make just 3 double crochets. That’s what we’ll be doing into all the side spaces from here on out.
After each cluster, remember to chain 1. In the corner, make 3 double crochets, chain 3 for the corner, and make 3 more double crochets to finish up the corner. Then chain 1 and make the next side space. Continue in this manner around until you reach the first corner, and make your joining slip stitches. Round 3 is finished! {above picture}
Future Rounds: Follow the directions for Round 3; you’ll see the only difference is that the sides get longer, so you’ll be making more side spaces. There will still only be 4 corners each round. You’re chaining 3 in the corners and chaining 1 between side spaces. It’s that simple; that’s why I love the granny square, because there’s only one round to remember once you get going!
Joining Granny Squares
Once you’ve made a bunch of granny squares, you’re probably going to want to join them together. This can be a scary thought, but there are some very easy ways to do it if you don’t want to tackle a complicated seam. I’m going to share some links to my favorite joining methods.
First, though, I like to decide on an order for the squares, which is sometimes the hardest part! This is the order I decided on for our puppy’s, Maisie’s, blanket. I like to take a picture of it so when the order gets jumbled up (which it will, if there’s a puppy afoot), I can remember where they go. That’s a tip I learned from my mom, who has joined many granny squares in her life as well. 🙂
For this afghan, I’m joining the squares as you go. This basically means I’ll be adding another row on each of them (a dark pink – I’m really bad at color names), and connecting them as I go. This is great because you don’t have to do any extra seams at the very end, but it’s a little more complicated to learn at the beginning. However, it’s well worth the time. Here is a fantastic tutorial by Lucy from Attic24, which is just about the best crochet blog in the history of crochet blogs. Her afghans are absolutely gorgeous, and I have gotten a TON of inspiration from her!
You could sew the squares together, which is often the first thing people think of for joining squares. I haven’t personally done this, but it’s good to know how to do. Here’s a lovely tutorial from Bunny Mummy, another one of my favorite ever crochet blogs!
One of my personal favorites is one that I learned from Astri at Apple Blossom Dreams, which is included with her AMAZING Granny Rose Crochet-A-Long. I would be remiss if I did not mention the granny roses in this post, because they’re a huge part of what hooked me on granny squares. Astri is the sweetest person ever and was super supportive as I learned to crochet and started my own blog. Her crochet-a-longs are super fun, too! 🙂
Also, check out this list of 12 different ways to join granny squares on Moogly. There are some wonderful methods in there, and you’re sure to find one that’s perfect for your project.
I hope you enjoyed this post; like I said, I’m a little overly enthusiastic about granny squares. There are so many opportunities to mix things up – I didn’t even get into changing colors! What are your thoughts on the famous crochet square? Have you made granny squares in the past? 🙂
Amazing post! I, too, have an obsession with granny squaures. 😉 They’re just so awesome–a perfect mix of easy and entertaining! You did a lovely job with the instructions, too! 🙂 <3 And I love your color scheme!
Thank you so much, Grace! Granny squares are the best, glad I’m not the only one a little obsessed with them – they’re definitely both easy and entertaining, nicely put! 😀 And thank you, hehe, I hope the puppy likes the color scheme! 😛
A giant granny square afghan was my first crochet make too! I think it’s still my favourite 🙂
Ooh, that’s awesome – a fantastic first make! 😀 I’d love to make a giant granny square sometime, I admire your patience! 🙂
It was all still new and exciting, I’m not sure I could make one as big now I know all these other exciting stitches!
I love granny squares …so simple, so versatile to make anything. my latest is Christmas stockings, in traditional colours of green, white, red.